How to Grow a Pine Tree from a Cutting at Home
I’ve always admired pine trees, their resilience and evergreen beauty. For a while now, I’ve been curious about how to grow a pine tree from a cutting at home. It seems like a rewarding way to get more of these wonderful trees, especially if I want a specific variety. I’ve gathered some information and decided to give it a try myself. It’s not as straightforward as rooting a houseplant, but with the right approach, I think it’s achievable. This guide is what I’ve learned about the process, from picking the right time to caring for the new sprouts.
Key Takeaways
- Taking cuttings from pine trees is possible, though it requires patience and specific conditions for success.
- The best time to take pine cuttings is generally in early to mid-autumn or midwinter, aiming for the current year’s growth.
- Using rooting hormone on the cut end of the stem can significantly help in developing roots.
- A well-draining, airy rooting medium, like a mix of peat and perlite or sand, is important for preventing rot.
- Maintaining high humidity and consistent moisture, without overwatering, is key to keeping the cuttings alive until they root, which can take up to a year.
Benefits of Propagating Pine Trees from Cuttings
When I first started thinking about how to grow pine trees from cuttings, I was a bit intimidated. Pines aren’t like the easy-to-root shrubs you see in gardening magazines. However, the benefits make it worthwhile. For starters, propagating from cuttings means you get a clone of the parent tree. This is fantastic if you have a specific pine you love – maybe it has a unique shape, color, or it’s just a healthy specimen. You’re essentially getting a genetically identical baby tree, so it’ll grow up to look just like its parent. This is a big deal if you’re aiming for a particular aesthetic in your yard.
Another plus is cost. Buying mature pine trees can get pretty expensive, especially if you need several for a landscape project. Taking cuttings is a much more budget-friendly way to expand your collection or fill out your garden. Plus, there’s a real satisfaction in nurturing a plant from a small cutting to a tree. It’s a slower process, sure, but the connection you feel to the plant is different.
Here are a few key advantages:
- Genetic Consistency: You get a tree that’s exactly like the one you took the cutting from.
- Cost Savings: It’s significantly cheaper than buying young trees.
- Personal Satisfaction: There’s a unique reward in growing your trees from scratch.
- Conservation: It’s a way to propagate rare or specific pine varieties.
While it takes patience, growing pines from cuttings offers a direct way to replicate desirable traits and can be a very rewarding gardening project.
It’s also a great way to experiment with different pine varieties without a huge investment. If you’re curious about how a particular type of pine will do in your area, taking a few cuttings is a low-risk way to find out. It’s a bit like a trial run for new plants. For those interested in the science behind it, using a good rooting medium, like the kind used for soil propagation, can really help the cuttings establish strong roots. This method often leads to healthier plants in the long run.
Selecting the Right Pine Species for Cutting Propagation
When I first thought about propagating pine trees from cuttings, I wasn’t sure where to start. It turns out, not all pine species are equally cooperative when it comes to taking cuttings. Some are much easier to root than others, and picking the right one can make a difference in your success rate. I’ve found that species that are generally more vigorous and adaptable tend to be better candidates for propagation via cuttings.
It’s a good idea to research pines native to your specific region. For instance, a pine that thrives in a hot, southern climate might struggle if you try to propagate it in a cooler, northern area. Checking with your local extension service or a knowledgeable garden center can give you a good idea of which pines do well locally. This can help you select a species that’s not only beautiful but also more likely to root successfully for you.
Some pines are known to be more amenable to cuttings. For example, I’ve read that Norfolk Island pines are relatively easy to propagate from tip cuttings. When you’re looking at different pine varieties, consider their growth habits and how they’ve performed in similar climates to yours.
Here are a few types of pines that are often mentioned as being good for propagation:
- Dwarf Mugo Pine (Pinus mugo): This is a slower-growing, bushy pine that’s often used in foundation plantings. Its compact size and adaptability make it a good candidate.
- Virginia Pine (Pinus virginiana): Also known as scrub pine, this species is quite hardy and native to the eastern U.S. It tends to be a more forgiving option.
- Eastern White Pine (Pinus strobus): While this one grows quite large, it’s a popular and beautiful pine. If you have the space, it can be a rewarding tree to propagate.
Choosing a pine species that is well-suited to your climate and has a reputation for being easier to root from cuttings will significantly increase your chances of a successful propagation. Don’t be afraid to ask for advice from local gardening experts or experienced growers.
Ultimately, the best pine for you to try propagating will depend on your local conditions and what’s available. But by doing a little homework on species that are known to be more cooperative, you can set yourself up for a much smoother propagation journey.
Optimal Timing
Figuring out the best time to take cuttings from a pine tree is pretty important if you want to have a good chance of success. I’ve found that while you can technically take cuttings at various times, there are windows that work much better than others.
Generally, the ideal period for taking pine cuttings is during the late summer or early fall. This is when the new growth from the spring has started to mature a bit, becoming semi-hardwood. These types of cuttings are usually the most reliable for rooting. Taking cuttings when the wood is too soft, like during the peak of summer, can lead to rot, and if it’s too hard, like from older wood, it might struggle to root at all.
Another good time, though perhaps a bit trickier, is during the winter months, specifically mid-winter. At this point, the tree is dormant, and the cuttings are from the previous year’s growth. This can work, but you need to be extra careful about the conditions you provide for rooting.
Here’s a quick rundown of what I consider:
- Early to Mid-Summer: Best for softwood cuttings. These are from the current season’s growth, which is still quite flexible. They root quickly but are more prone to drying out.
- Late Summer to Early Fall: This is prime time for semi-hardwood cuttings. The wood has started to firm up, but isn’t fully mature. This is often my go-to period.
- Mid-Winter: Good for hardwood cuttings from dormant trees. These can be slower to root and require patience.
It’s also worth noting that the specific species of pine can influence the timing. Some pines might be more forgiving than others. I always try to research the particular type of pine I’m working with. For instance, understanding when to take semi-hardwood cuttings can be a good starting point for many conifers.
Patience is key. No matter when you take your cuttings, remember that pines can take a long time to develop roots, sometimes up to a year or even longer. Don’t get discouraged if you don’t see immediate results.
Tools and Materials Needed for Pine Tree Propagation
To get started with propagating pine trees from cuttings, I’ve found that having the right tools and materials makes a big difference. It’s not overly complicated, but having everything ready beforehand really smooths out the process.
Here’s what I usually gather:
- Sharp Pruning Shears or a Knife: You need something clean and sharp to make a good cut. A dull tool can crush the stem, which isn’t good for rooting.
- Rooting Hormone: This is pretty important for encouraging new root growth. I usually go for a powder form, but liquid works too.
- Growing Medium: A mix that drains well is key. I often use a 50/50 blend of peat moss or coco coir and perlite or coarse sand. Some people use just perlite or a mix with bark.
- Pots or Trays: Small pots, about 3-4 inches in diameter, work well for individual cuttings. You can also use seed trays with larger cells.
- Plastic Bags or Clear Covers: To keep the humidity up around the cuttings, a clear plastic bag supported by stakes or a clear plastic container lid is helpful.
- Watering Can or Mister: For keeping the growing medium consistently moist.
- Labels: It’s a good idea to label your cuttings with the date and type of pine, just so you don’t forget.
Having the right setup from the start means fewer headaches later on. It’s all about creating a good environment for those cuttings to get established.
Having clean tools is probably the most overlooked, yet vital, part of this whole operation. It helps prevent any diseases from getting into your cuttings right from the start.
How to Take Healthy Pine Cuttings
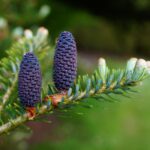
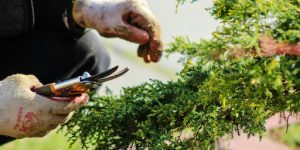
Taking cuttings from a pine tree requires a bit of care, but it’s doable. My approach usually starts with selecting the right kind of branch. I look for stems from the current year’s growth, typically about 4 to 6 inches long. These should feel somewhat flexible but not too soft, and ideally, they’ll have a bit of new growth at the tip. It’s important to get healthy material; avoid anything that looks diseased or damaged. I usually try to take several cuttings at once, just to improve my odds of success.
Here’s a breakdown of how I prepare them:
- Select the cutting: Look for a 4-6 inch piece of new growth from the current year. It should be firm but slightly bendable.
- Prepare the cutting: Gently strip the needles from the bottom third to the middle of the cutting. This part will be going into the soil, and you don’t want needles in there, as they can rot.
- Make a clean cut: Use a sharp knife or pruners to make a clean cut at the bottom of the cutting. Some people like to make a small vertical slit or two at the very bottom to expose more surface area for rooting, which I sometimes do.
It’s really important to use clean tools. I always wipe down my knife or pruners with rubbing alcohol before I start. This helps prevent introducing any diseases to the cutting or the parent tree.
After preparing the cuttings, I usually dip the bottom inch or so into a rooting hormone. This isn’t strictly necessary for all plants, but for pines, I find it helps encourage root development. I’ve had better luck with rooting hormone, so I don’t skip this step. You can find rooting hormone at most garden centers. I’ve found that using it can make a noticeable difference in how quickly and how well the cuttings root. It’s a simple step that can really boost your chances of getting a new pine tree started, and it’s worth looking into if you’re serious about propagation. For example, I’ve seen good results when propagating other woody plants using this method, so I stick with it for my pines too. It’s a good idea to check out resources on how to root pine cuttings to get a feel for the process.
Preparing Pine Cuttings for Rooting
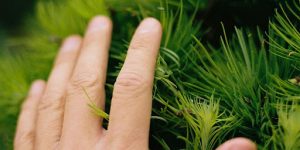
After I’ve taken my pine cuttings, the next step is getting them ready for the rooting process. This involves a few key actions to give them the best shot at developing roots. First, I need to prepare the cuttings themselves. This usually means removing the needles from the lower portion of the stem. I typically clear off about one-third to one-half of the bottom needles. This prevents them from rotting when they’re in the soil and also exposes the part of the stem where roots are most likely to form.
It’s important to be gentle here; I don’t want to damage the stem or the remaining needles.
- Remove lower needles: Carefully strip needles from the bottom 1/3 to 1/2 of the cutting.
- Clean the stem: Make sure the exposed stem is clean and free of any debris.
- Avoid damaging the cambium: Be careful not to scrape the bark or the green layer underneath, as this is where root formation begins.
I find that using a sharp knife or even just my fingernails works well for removing the needles. The goal is to expose the stem without causing any injury.
Once the lower part of the stem is cleared, I’m ready to move on to the next stage, which often involves using a rooting hormone. This isn’t strictly necessary for all pine species, but I’ve found it helps speed things up and increases the success rate, especially with cuttings from older trees. I’ll be sure to dip the prepared end of the cutting into the hormone before planting it. This step is pretty straightforward, but it’s important to follow the product’s instructions carefully. Getting the right propagation media is also key at this stage.
Applying Rooting Hormone
When I first started trying to root pine cuttings, I wasn’t sure if I needed rooting hormone. Some sources say many pine species will root without it, and that’s true to an extent. However, I’ve found that using a rooting hormone does make a difference, especially if I want to increase the number of cuttings that take and speed up how fast they develop roots. It’s particularly helpful for those pine varieties that are a bit trickier to root.
There are a few types of rooting hormone available: powders, liquids, and gels. I’ve been leaning towards the gel formulations lately because they seem to give me a slightly better success rate. Some brands offer different strengths, often color-coded. For instance, a red formulation might be recommended for older, hardwood cuttings, while a green one is meant for softer, newer growth. I tried the red one on some juvenile pine cuttings recently, and they did okay, but I’m curious if the green might have produced even more roots per cutting. I’ve picked up some green to test this out.
Here’s a quick rundown of how I typically apply it:
- Prepare the cutting: Make sure the bottom inch or so of the cutting is clean and free of needles.
- Dip the cutting: Gently dip the prepared end of the cutting into the rooting hormone, making sure to coat the area where roots are expected to form.
- Tap off excess: Lightly tap the cutting to remove any excess hormone. You don’t want clumps, just a thin, even coating.
- Plant immediately: Place the treated cutting into your prepared rooting medium right away. Don’t let the treated end dry out.
It’s important to remember that rooting hormone isn’t a magic bullet. It’s a tool to help the process along, but the cutting still needs the right conditions – good humidity, proper moisture, and suitable temperature – to thrive. I’ve learned that patience is key; sometimes it takes a long time for these cuttings to show signs of life.
Choosing the Right Growing Medium for Pine Cuttings
When I’m trying to get pine cuttings to root, the growing medium is pretty important. It needs to let air get to the roots, hold some moisture, and keep the cuttings upright. I’ve found that a mix works best for me.
My go-to blend is usually a 50/50 combination of coco coir and coarse perlite. Coco coir is great because it holds water without getting waterlogged, and the perlite adds that all-important drainage and aeration. This kind of mix is pretty standard for a lot of cuttings, not just pines. It’s also good to make sure whatever you use is relatively clean, so you don’t introduce any pests or diseases to your new baby pines.
Some people also use a mix of peat moss and sand, or even just perlite on its own. The key is that it’s loose and drains well. You don’t want the cuttings sitting in soggy soil, or they’ll just rot.
The goal is to mimic the conditions that encourage root growth – good air flow, consistent moisture, and a stable environment.
If you’re just starting, you might find that a pre-made seed starting mix works in a pinch, but I usually find it’s a bit too fine and can compact too easily. I prefer something with a bit more grit to it. It’s also worth noting that pine needles themselves can be used in compost, but they should only make up a small part of the mix to avoid making it too acidic or slow to break down. For rooting cuttings, though, you want something more inert.
I usually fill small pots or trays with my chosen medium, making sure it’s moist but not dripping wet before I stick the cuttings in. It’s a simple step, but getting the medium right makes a big difference in whether those cuttings eventually develop a good root system. I’ve had decent luck with a mix of pine bark, peat, and sand, too, so there’s some flexibility here.
Planting Pine Cuttings
Once your pine cuttings have developed a decent root system, it’s time to get them into their pots. I usually wait until I see some new growth on the cutting, which is a good sign that roots are forming below.
When I plant them, I make sure to use a potting mix that drains well. A mix of potting soil with some perlite or coarse sand usually does the trick. I gently remove the cutting from its original rooting medium, trying not to disturb the new roots too much. Then, I place it in a new pot, filling in around the roots with the fresh potting mix. It’s important to plant them at the same depth they were growing before.
After planting, I give them a good watering. For the first few days, I like to keep the newly potted cuttings in a spot with bright, indirect light. This helps them adjust without getting too much sun shock.
- Handle the roots with care; they are delicate at this stage.
- Use a potting mix that allows for good drainage.
- Plant the cutting at the same soil level it was previously.
- Water thoroughly after planting.
- Provide indirect light for the first few days.
Patience is key here. It might take a while for the cuttings to really establish themselves in their new pots. I usually wait until I see noticeable new growth before I consider them ready for the next step, which might be moving them to a larger pot or even outdoors if the weather is right. It’s a slow process, but seeing those little pines grow makes it all worthwhile.
I find that adding a little slow-release fertilizer at this stage can also give them a good start. Just be sure to follow the product’s instructions so you don’t overdo it. You can find more information on general pine care at local garden centers.
Creating the Ideal Environment

Getting the environment just right for your pine cuttings is pretty important if you want them to take root. Think of it like creating a mini-greenhouse for them. Humidity is a big one; pines like it moist, but not soggy. Too dry, and they’ll shrivel up before they even think about growing roots. Too wet, and you risk rot. I usually aim for a consistent humidity level, somewhere around 70-80%. You can achieve this in a few ways. For a small setup, covering your pots with a clear plastic bag supported by wire hoops works well. Just make sure to open it up for a bit each day to let in fresh air and prevent mold. Another option is to place multiple pots inside a larger clear plastic tote. This traps moisture effectively. If you’re doing a larger batch, an automatic misting system can be a game-changer, keeping the air and the cuttings themselves consistently moist without overdoing it. This helps keep the leaves hydrated while the roots are forming.
Temperature is the other piece of the puzzle. Pines generally prefer moderate temperatures. I’ve found that keeping the rooting area between 65°F and 75°F (18°C – 24°C) gives me the best results. Avoid placing your cuttings in direct, hot sunlight, as this can quickly overheat the enclosed environment and cook your cuttings. A bright spot with indirect light is usually ideal. If you’re using a heat mat, be very careful with the temperature setting; you want gentle warmth, not intense heat. It’s a balancing act, really. Too cold, and root development slows to a crawl. Too hot, and you risk damaging the delicate tissues.
Maintaining a stable environment is key. Fluctuations in humidity and temperature can stress the cuttings, making it harder for them to establish roots. Consistency is your best friend here.
Here’s a quick rundown of what I try to maintain:
- Humidity: 70-80% relative humidity.
- Temperature: 65-75°F (18-24°C).
- Light: Bright, indirect light.
Checking on your cuttings regularly is also part of creating the right environment. You’re looking for signs of new growth, but also keeping an eye out for any issues like mold or wilting. Adjust your humidity and temperature controls as needed. It might take a little trial and error to find what works best for your specific setup and the pine species you’re working with, but getting these conditions right is a big step towards successful pine propagation.
Monitoring and Caring for Rooting Pine Cuttings
Once you’ve got your pine cuttings planted, the real waiting game begins. It’s not like watching a pot of beans sprout; these guys can take their sweet time. My approach is to keep things consistent, which I think is key.
First off, humidity is a big deal. I usually cover the pots or trays with a clear plastic bag, propped up with a few sticks so it doesn’t touch the needles. This creates a mini-greenhouse effect. I check it daily, and if I see a lot of condensation, I’ll lift the bag for a bit to let some air circulate. Too much moisture can lead to mold, and that’s a fast track to losing your cutting.
Temperature is also important. I try to keep them in a spot that gets bright, indirect light, and the temperature stays fairly stable, ideally around 65-70°F (18-21°C). Avoid direct sun, as it can scorch the cuttings and dry out the medium too quickly. If your house is on the cooler side, a heat mat designed for seedlings can make a difference, but I haven’t found it strictly necessary for pines if the ambient temperature is right.
Watering needs to be done carefully. The goal is to keep the rooting medium consistently moist, but not waterlogged. I usually give them a gentle watering when the top layer of the medium starts to feel dry. It’s better to water less often but thoroughly than to keep the soil constantly soggy.
Patience is truly the name of the game here. Some sources say it can take up to a year for pine cuttings to show significant root development. I try not to disturb them too much during this period, resisting the urge to pull them up and check for roots. It’s a test of willpower, for sure.
I also keep an eye out for any signs of trouble, like wilting, yellowing needles, or mold. If I spot mold, I’ll try to increase air circulation and maybe remove the affected cutting. Yellowing needles can sometimes mean it’s too dry, or perhaps it’s just the natural shedding of older needles, so I try not to panic immediately.
Here’s a quick rundown of what I monitor:
- Moisture levels: Keep the medium damp, not wet.
- Light: Bright, indirect light is best.
- Temperature: Aim for a stable, moderate temperature.
- Air circulation: Prevent mold by allowing some airflow.
- Signs of stress: Watch for wilting, yellowing, or mold.
Transplanting Rooted Pine Cuttings to Pots or Garden
Once I see some good root development, usually indicated by new growth or resistance when I gently tug on a cutting, it’s time for the next step: transplanting. This is a delicate phase, so I try to be as gentle as possible to avoid damaging those new roots I worked so hard to establish.
First, I gather my supplies. I’ll need individual pots, a good quality potting mix that drains well – often a blend of compost, perlite, and maybe some sand works for me – and perhaps a bit of slow-release fertilizer. I like to use pots that are a bit larger than the current root ball, giving the young pine some room to grow.
Here’s how I typically handle the transplanting:
- Prepare the new pots: I fill each pot with the prepared potting mix, making sure it’s moist but not waterlogged. I created a small well in the center of the soil.
- Gently remove the cutting: I carefully ease the rooted cutting out of its original medium. If it were in a tray, I might push it up from the bottom. If it were in a pot, I would turn it out, supporting the base of the cutting.
- Inspect the roots: I take a quick look at the root system. If the roots are tightly circling, I might gently tease them apart to encourage outward growth. This is also when I might add a small amount of slow-release fertilizer to the potting mix, mixing it in well.
- Plant the cutting: I place the cutting into the well I made in the new pot, ensuring the roots are spread out. I then backfill with soil, gently firming it around the base of the cutting to eliminate air pockets and provide support. I make sure no needles are buried in the soil.
- Water thoroughly: After planting, I water the newly potted cutting well to help settle the soil and hydrate the roots.
After transplanting, I move the pots to a location that gets bright, indirect light. I keep them out of harsh, direct sun for the first few days to help them adjust. It’s important to maintain consistent moisture in the soil, but again, avoid overwatering. I’ll continue to care for them in these individual pots until they are robust enough to be planted directly into the garden or a larger container, which might take another season or two.
Troubleshooting Common Issues in Pine Cutting Propagation
Sometimes, despite my best efforts, pine cuttings just don’t seem to take. It can be frustrating, but usually, there’s a reason. One common issue I run into is cuttings drying out before they can root. This often happens if the humidity isn’t high enough or if I’ve overwatered the rooting medium, making it soggy instead of just moist. Keeping the environment consistently humid is key.
Another problem is rot. If the rooting medium stays too wet, the cuttings can develop fungal issues and just turn mushy. It’s a fine line between keeping them moist and waterlogged. I’ve learned to poke a few extra holes in any plastic covers I use if I see condensation building up too much inside.
Sometimes, the cuttings just don’t show any signs of rooting, even after a long time. This could be due to a few things:
- Taking cuttings at the wrong time: While I aim for late summer or early autumn, taking them too late in the season, when growth has slowed down, can make a difference.
- Using old wood: Cuttings from very mature wood are much harder to root than those from younger, more vigorous growth. I try to stick to current or last year’s growth.
- Lack of rooting hormone: While not always strictly necessary, using a rooting hormone can really give the cuttings a boost, especially if I’m trying a species that’s known to be a bit trickier.
If I notice the needles turning brown and falling off, it’s usually a sign of stress. This could be from too much direct sun, inconsistent watering, or even a disease. I try to move them to a shadier spot and check the moisture levels carefully. Browning, especially starting from the trunk and moving outwards, can sometimes indicate root rot, similar to how pine trees can appear to be dying.
It’s important to remember that propagating pines from cuttings is often a slow process. Patience is a virtue here. I’ve had cuttings take almost a year to show significant root development, so I try not to get discouraged if I don’t see results immediately. Consistent care and the right conditions are more important than speed.
Having trouble getting your pine cuttings to grow? Section 13, “Troubleshooting Common Issues in Pine Cutting Propagation,” covers frequent problems and how to fix them. Learn how to overcome these hurdles and boost your success rate. For more detailed advice and to see how our expert services can help your propagation efforts, visit our website today!
Frequently Asked Questions
When is the best time to take pine tree cuttings?
I can take cuttings from pine trees from summer until just before new growth starts in spring. However, the best time to get cuttings to root is usually in early to mid-autumn or even in the middle of winter. This timing helps ensure the cuttings have a good chance to develop roots before the growing season kicks off.
What kind of pine cuttings should I take?
To increase my chances of success, I usually take several cuttings, aiming for pieces that are about 4 to 6 inches long. I prefer to select cuttings from the current year’s growth, and it’s best if they look healthy and don’t show any signs of disease. Cuttings with new growth at the tips tend to do well.
How do I prepare the pine cuttings before planting?
I prepare my cuttings by removing the needles from the lower half or third of the stem. Then, I dip the bottom inch of each cutting into a rooting hormone powder. This helps encourage the development of roots.
What is the best soil mix for rooting pine cuttings?
For the growing medium, I like to use a mix that is loose and allows air to move freely. A good combination is pine bark, peat, or perlite mixed with coarse sand in equal parts. It’s important to water this mix until it’s moist but not waterlogged.
How can I create the right environment for my pine cuttings to root?
After planting the cuttings, I cover the container with clear plastic to create a humid environment, much like a mini-greenhouse. This helps keep the cuttings from drying out. I also find that placing the container on a heating mat set around 68°F (20°C) and in bright, indirect light helps them root faster.
How should I care for the pine cuttings while they are rooting?
I keep the growing medium consistently moist but avoid overwatering, as this can cause the cuttings to rot. If I see a lot of condensation on the plastic cover, I’ll poke a few small holes to let some air in and reduce excess moisture.
How long does it take for pine cuttings to root?
Patience is key! It can take up to a year for pine cuttings to develop a strong enough root system. I know they are ready when I see new growth appearing, and I can gently tug on them to feel resistance, indicating roots have formed.
When and how should I transplant the rooted pine cuttings?
Once my pine cuttings have successfully rooted and show good growth, I carefully transplant each one into its own pot filled with a standard potting mix. At this stage, I might add a little slow-release fertilizer to support their continued growth before they are ready to be planted in their final location.
Request a Quote
Our Services